General installation instructions
Before starting your installation, disconnect the battery’s negative terminal to prevent damage to the unit, fire and / or risk of injury.
Install your DIRECTOR in a dry location with sufficient air circulation for proper cooling of the equipment.
For safety reasons the DIRECTOR must be installed professionally to prevent hazard to the vehicle and / or risk of injury to the passengers during a critical driving situation such as an emergency braking.
The remote control should be secured to a solid mounting surface using proper mounting hardware.
Attention: During assembly make sure that the DIRECTOR cannot interfere with any safety system of the car (e.g. airbags).
Prior to installation, plan the wire routing to avoid any possible damage to the wire harness. All cabling should be protected against possible crushing or pinching hazards. Also avoid routing cables close to potential noise sources such as electric motors, high power accessories and other vehicle harnesses.
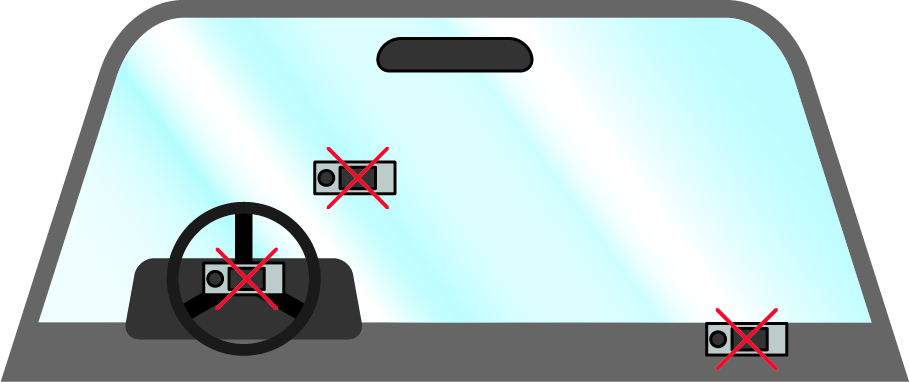
- Do not mount the remote control on faceplates of airbags (e.g. steering wheel or car dashboard)
- Do not mount the DIRECTOR in the view field of the driver
- Do not place the remote control unsecured on top of the dashboard
Connecting the DIRECTOR to a DSP
- Connect the rectangular 8-pole connector of the connection cable (included in delivery) to the DIRECTOR.
- DIRECTOR for SCP: Insert the 10-pole NanoFit plug of the connection cable into the SCP port of the DSP device.
DIRECTOR for Control Input: Insert the circular plug of the connection cable into the multi-functional input (Control Input) of the DSP device.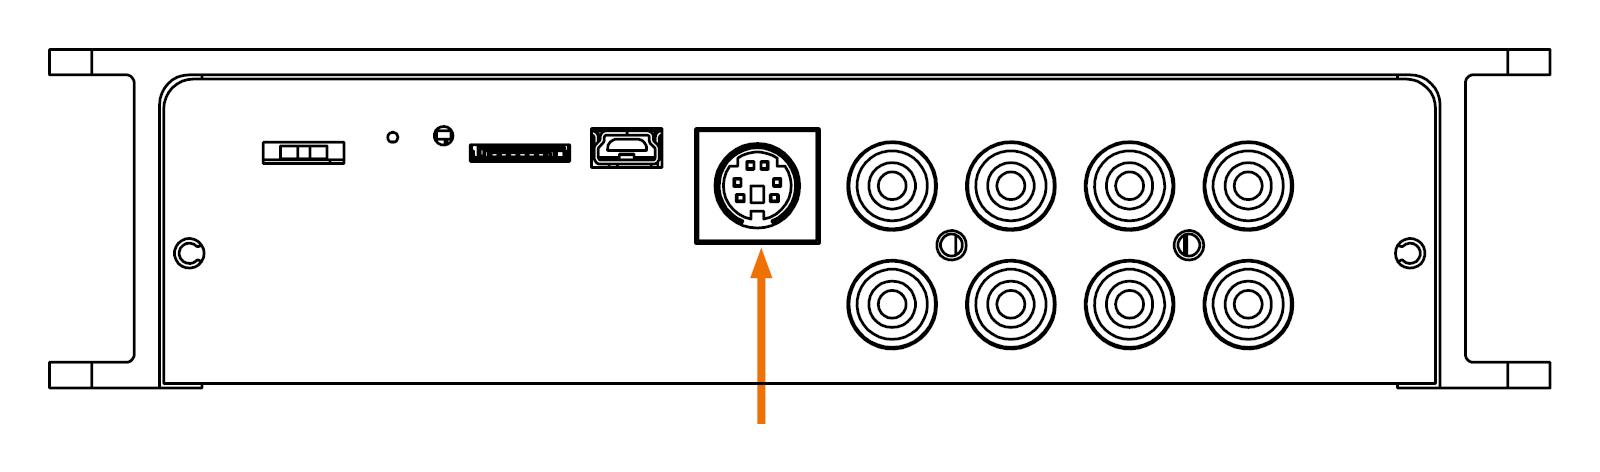
- Only DIRECTOR for Control Input (for SCP continue from point 4): At first connect the ground wire of the connection cable (Ground / brown) to a ground terminal (e.g. metal body of the vehicle or ground connector of a DSP / amplifier). Then connect the +12 V wire of the connection cable (+12 V / orange) to a +12 V voltage source (e.g. positive terminal of the battery or the +12 V connector of a DSP / amplifier).
Attention: Check the polarity prior to the installation in order to prevent damages of the DIRECTOR and / or DSP / amplifier / battery or other equipment.
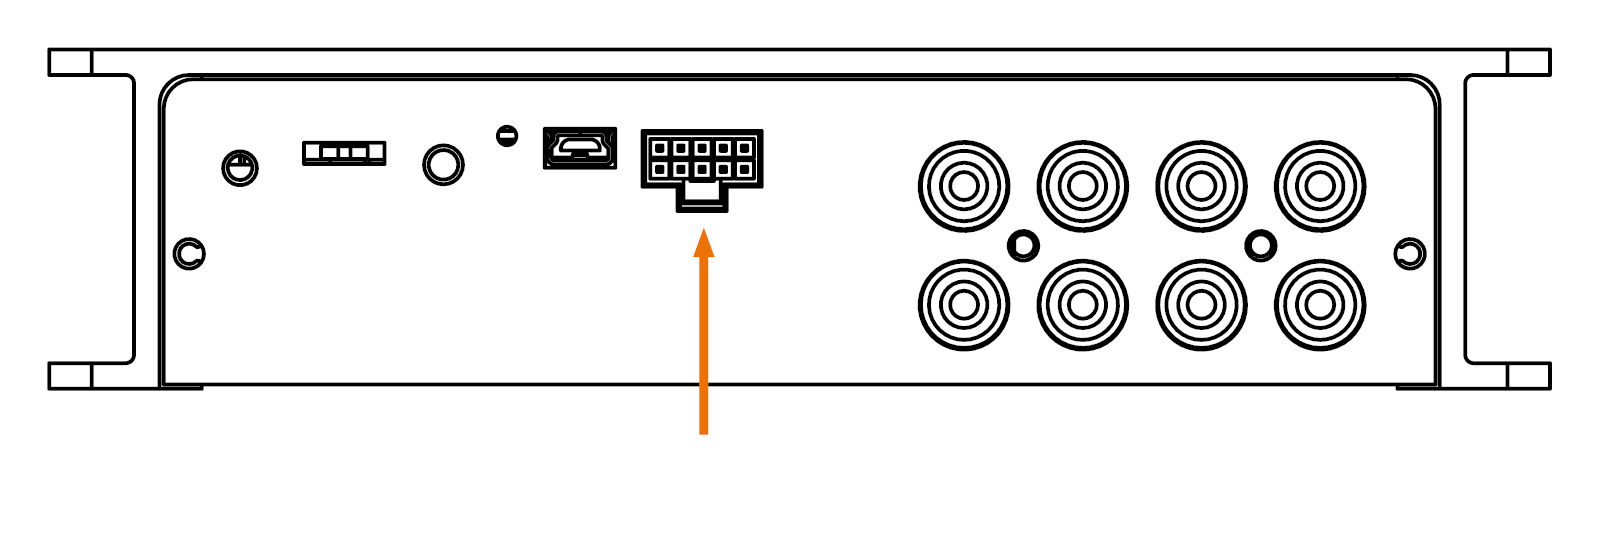
Example: Connecting the power wires to a HELIX DSP.3S is described in the following section.
Connect the ground wire (Ground / brown) of the connection cable to the ground terminal of the DSP (see figure below / black arrow). Then connect the positive wire (+12 V / orange) to the +12 V terminal of the DSP (see figure below / red arrow).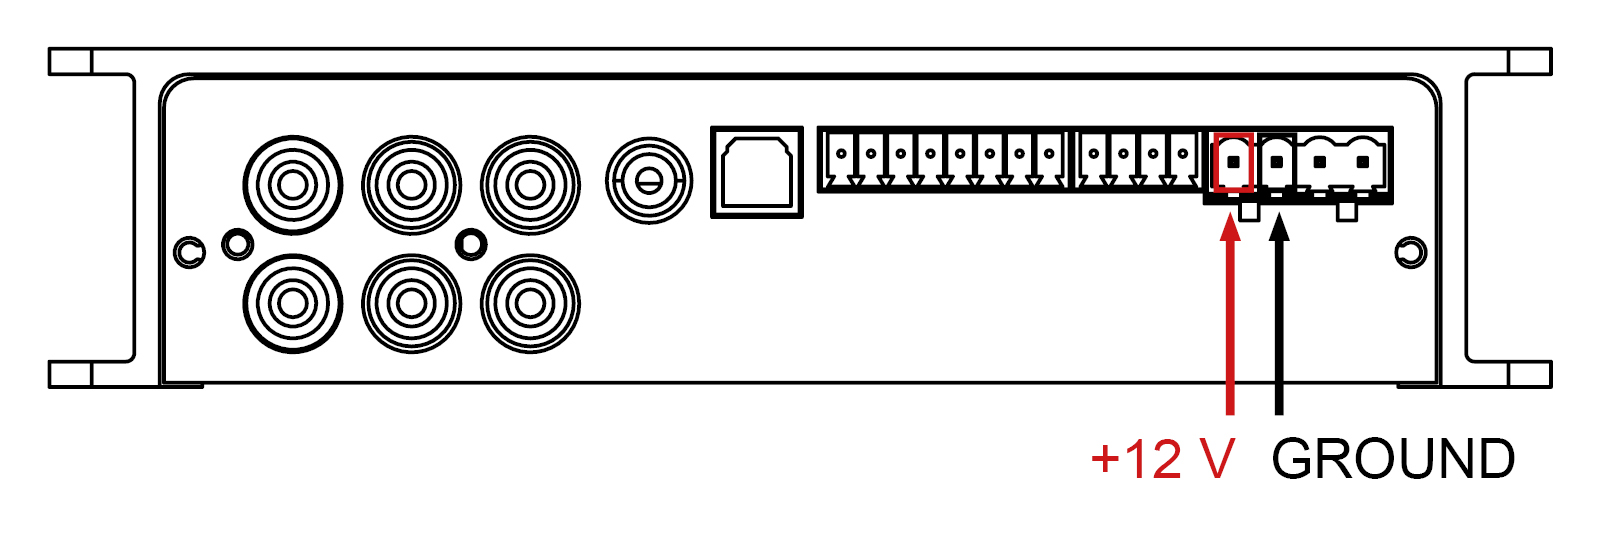
- Optional: The illumination wire (Light) can be connected to an illumination wire of the car (e.g. dashboard illumination). When the illumination wire is connected it is possible to use the automatic dimming function of the DIRECTOR.
-
Now you can turn on your sound system.
-
The DIRECTOR turns on automatically by switching on the sound system. In order to make adjustments the DIRECTOR must be activated in the DSP device. The activation of the DIRECTOR in the DSP PC-Tool is described in the following chapter “Initial operation”.


Beispiel: Im folgenden Abschnitt wird der Anschluss der Stromversorgung an einen HELIX DSP erläutert.
Verbinden Sie die Masseleitung des Anschlusskabels (Ground / braun) mit dem Masseanschluss des DSPs (siehe folgende Abbildung, schwarzer Pfeil). Anschließend die Versorgungsleitung (+ 12 V / orange) mit dem +12 V Stromanschluss des DSPs (siehe folgende Abbildung, roter Pfeil).
Inital operation
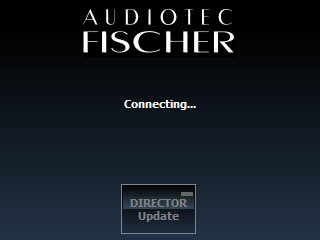
After turning on the sound system the DIRECTOR will automatically establish a connection to the DSP.
The window is shown on the DIRECTOR`s screen during connection. Pressing the „DIRECTOR Update“ activates an update mode for the internal DIRECTOR`s firmware.
Note: The connection setup can take a few seconds
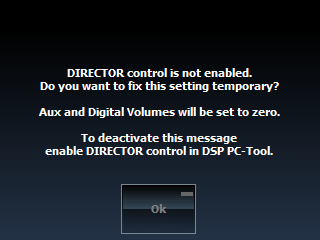
In order to use the DIRECTOR the device has to be activated/registered in the DSP. If the connection is successfully done and the DIRECTOR is not activated/registered in the DSP the following message will appear:
By confirming the warning message the DIRECTOR will be temporarily activated.
Note: The temporary activation has to be repeated after every restart. For safety reasons the volumes for HEC/MEC/AUX and Digital Optical will be set to -60 dB (mute) after confirming the warning message.
Permanent activation with the DSP PC-Tool software
It is strongly recommended to permanently activate the DIRECTOR in the DSP PC-Tools DCM menu.
-
The connection with the computer differs depending on the DSP PC-Tool version used:
DSP PC-Tool 5: Connect the DSP device with the provided USB cable to the USB port of your computer. Do not extend the included USB cable with a passive extension cable; otherwise a proper communication can not be ensured. To extend the included cable always use an active USB cable with an integrated repeater.DSP PC-Tool V4.80b and earlier: Connect the DIRECTOR with the provided USB cable to the USB port of your computer. Do not extend the included USB cable with a passive extension cable; otherwise a proper communication can not be ensured. To extend the inlcuded cable always use an active USB cable with an integrated repeater.
Note: The USB input of the DSP device is deactivated as soon as the DIRECTOR is connected to the Control Input / SCP port. - Switch on the DSP device and start the DSP PC-Tool software. The DIRECTOR will be turned on automatically.
Note: If the operating software of the DSP is not up-to-date it will be updated automatically. - Go to the “Device Configuration Menu” in the DSP PC-Tool software. In the “extended features” tab you can activate the DIRECTOR as a remote control.
- To finish the setup and save the adjustment click on the “Save & Store” button.
- The activation is finished.

1. Connection of the DIRECTOR to the DSP
2. Activation of the DIRECTOR

After turning on the sound system the DIRECTOR will automatically establish a connection to the DSP.
The window is shown on the DIRECTOR`s screen during connection. Pressing the DIRECTOR Update activates an update mode for the internal DIRECTOR`s firmware (see “Setup configuration of the DIRECTOR”, chapter 3.3 “DIRECTOR Update”).
Note: The connection setup can take a few seconds.
In order to use the DIRECTOR the device has to be activated / registered in the DSP. If the connection is successfully done and the DIRECTOR is not activated / registered in the DSP this message will appear (see picture).
By confirming the warning message the DIRECTOR will be temporarily activated.
Note: The temporary activation has to be repeated after every restart. For safety reasons the volumes for HEC/MEC/AUX and Digital Optical will be set to -60 dB (mute) after confirming the warning message.